Monday, January 28, 2013

Nightstand Makeover :)

What a difference a paint job makes!


I bought this nightstand at a garage sale for $2.50. What a steal!  I did have it hanging out the back of the car from Whittier, CA to Las Vegas, though.   I was not going to let that stop me, I loved it!

I removed the hardware first, then gave it a good sanding.  After, I gave it a good washing to get rid of the sanding dust.  While it was drying, I dipped the hardware in the paint and let them dry on a piece of wood.  Then, I gave it two coats of paint, letting the first coat dry for two hours before applying the second coat.  I let second coat dry overnight before I put the hardware back.

I really like the end results and it matches the decor in my room now.  My husband wants me to change the hardware, he says the nightstand is constantly smiling at him when he comes in the room.  I'll think about it, I like it just the way it is and since I already had the paint, it only cost me the original $2.50. :)

Sunday, January 27, 2013

Piano Bench Makeover

Yikes!  This $3 garage sale piano bench was filthy and smelled.  Of course, that didn't keep me away!  I bought it at a garage sale in Big Bear, CA and brought it all the way back to Las Vegas, much to my husband's dismay. :)

$17 in supplies and about two hours worth of labor and it looks amazing!


First, I unscrewed the padded seat and threw everything away except the wood.  I sanded the wood and then washed off all the dust. 

Next, I gave the wood two coats of spray paint.  As that was drying, I covered the bench wood with padding and material and used a staple gun to attach both to the back.

Lastly, I re-screwed the bench back on top of the base.   It looked slightly plain, so I hot glued the fringe around the perimeter.  
I love it!

Snowman Craft

These cute picture frames are a fun craft and a great gift from a child.  I gave my students a choice of what kind of snowman they would like to make and they came up with a melted snowman, a three snowball snowman, a two snowball snowman, and a snowman looking up.


Supplies were: 
  • white construction paper for the snowman
  • buttons for the eyes, nose and buttons
  • orange foam for the nose
  • brown marker for the stick arms
  • black construction paper for the top hat
  • puff balls and pipe cleaners for the ear muffs
  • large puffballs for the melted snowman's head
  • colored felt for the scarf
  • black marker for the mouth
  • empty picture frame
  • paint
  • paint brushes
  • colored paper for the background
  • foam snowflakes
  • Elmer's glue
I had my students paint the frame the first day and let it dry overnight.  Then, I put samples of each snowman on the board and put all of the supplies out on a table.  They came to the table as they needed a supply.  

I again let it dry overnight to let the glue dry before they wrote on the frame with marker.

The total time for each frame was less than an hour, minus drying times. 

They gave the frame to their parents as a Christmas or Hanukkah gift. :)  So cute!

Sunday, January 20, 2013

From Candle Holder to Serving Dish

I found a candle holder at a garage sale for $3, talked them down to $1, came home and transformed it into a serving dish.  I love that it's elevated so I can put more food on the table.

The glass piece unscrewed (of course, I saved it!), but if it hadn't, I would've just broken the glass out lower than the top of the wooden piece.

I got out my hand sander and sanded the wood for a distressed look.  

I had previously purchased four plates for $1 at a garage sale and was holding on to them waiting for a good idea to come along.  I used E6000 clear epoxy (any multi-surface glue will work) around the top of the candle holder and put it upside down on the back of one of the plates.  

After a few hours, I turned it right side up and had an elevated serving dish.

The Lorax

We found The Lorax on Netflix and all of the sudden, it became a Lorax weekend!


I bought a $5 throw to use for the Thneed.  After sewing, in order to turn it inside out, I had to sew the middle after I turned it inside out.  
It really does have a million uses!

I used embroidery thread to make the Truffula trees.  I wrapped the thread around two fingers, slipped it off and tied a string tight around the middle.  Then, I cut all the loops.  After I fluffed the puffy ball, I slid a twig inside the string I had tied in the middle.

The Lorax pancake is made out of one marshmallow cut in half for the eyes, two chocolate chips, mandarin oranges, pancake mix and yellow and red food coloring.

It's been a fun weekend, all for less than $10!

Wednesday, January 2, 2013

Curio Makeover

Well, thanks to my husband, who spilled a glass of water on my side curio table and didn't tell me, it now needed a makeover.

Before and After:


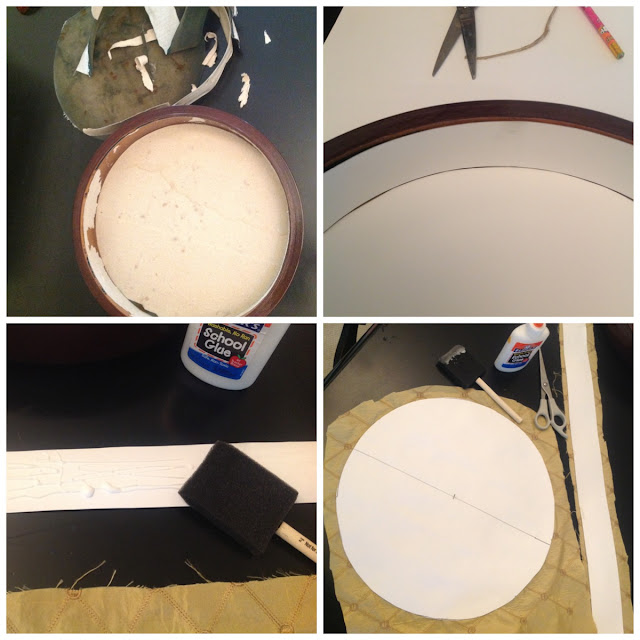
I started by ripping out the old velvet.  I  pulled out as much of the backing as I could, but left what was strongly attached.  I measured the height of the inside of the curio and cut a piece of poster board to that size.  Next, I measured the diameter of the circle and then googled how to cut a circle.  It ended up to be extremely quick and easy. Here is the link:


I glued a scrap piece of fabric to both pieces of poster board that I had cut.  After the glue was dry, I cut around the edges.  I covered the inside of the curio with glue and put the fabric-covered poster board in the curio.  I wanted the fabric to be slightly stiff, so I covered everything with Elmer's glue.  I quit using Mod Podge years ago and just use Elmer's, the effect is the same.  Once the glue had dried, I didn't like how the edge looked where the side strip met the bottom circle, so I ran to the fabric store and bought 2 yards of cord.  I hot glued the cord in the corner and I was done!  


The table looks so pretty now, I'm not sure that I'll put my key collection back in it.  They are a little rusty now from the water anyway... :)

Total cost: $7.98 for the cord.

Tuesday, January 1, 2013

Cottage Picture Holder

The perfect way to easily change photos!  

I bought an empty frame at a garage sale for $1, purchased mini clothes pins, gathered twine, foam board, and a material scrap from items I already had.

I cut the foam board to fit into the frame, covered the foam board with material and attached with dots of hot glue.  Then, before I put the material-covered foam board in the frame, I measured the inside height and divided by how many strings of twine I wanted in the frame.  I attached the twine inside the frame with dots of hot glue.  After the foam board was inside the frame, I clipped the mini clothes pins on the twine.  

Done!  


Total cost:  $4

Bulletin Board Makeover

Our bulletin board was in desperate need 
of a makeover!
I gathered a few items and got to work.  

Before:


I had a $5 broken garage sale frame, some leftover fabric from when I covered my dining room chairs, and a medallion that was hanging on my bedroom wall, but never really looked like it fit in with the rest of the room.

First, I removed the cork from the original frame and threw the rest of the old bulletin board in the trash.  I cut the cork board to the size of the new frame.  Then, I used a little hot glue to attach the fabric to the back of the frame to keep it from moving.  I placed the covered cork board in the frame and it was a snug fit since I had cut it to the exact size, I didn't need to use any hardware to keep it in the frame.  Lastly, I hot glued the medallion over the broken part of the frame. 


After:


I love it!  
The total cost was the $5 frame 
and less than two hours of my time. :)